This page describes my third I2C interfacing project. For a general overview of I2C and for basic information on how to use I2C devices from a NXT program, see the first part of this series.
This part describes a very simple temperature sensor for the NXT. There are many temperature sensors that integrate a temperature sensor and an I2C interface on the same chip. The one I used is called DS1631 and it is made by Maxim-Dallas. Many of these sensors are intented to be used inside computers and other electronic equipment that gets hot but that should not get too hot. These sensors measure their own temperature, the temperature inside the chip. Since the plastic packaging of the chip does not conduct heat very well, its takes these chips some time to report temperature changes. That is, if you suddently put the sensor in a very cold or very hot place, its own temperature changes only slowly, so it will take time until it report the outside temperature accurately.
I think that the sensor is not likely to be useful in many robots, because of its slow response, but it's an interesting class of sensors to experiment with.
I chose this chip because it claims a relatively small error, ±0.5°C; many sensors in the same class are only accurate to within 1 or 2°C. Apart from reporting temperature, it can also be used as a stand-alone thermostat, once you program the turn-on and turn-off temperatures (you program them via I2C commands). But I do not think that this feature is too useful for the NXT.
The interface to this chip is a bit complicated. In the simplest usage scenario you first read its configuration, to make sure it is what you want. The one bit in the configuration word that we really care about is the 1SHOT bit; it determines whether the chip will perform a single conversion when you tell it to, or will continuously perform conversions. If the configuration is wrong, you set it to what you want with another I2C command to the chip. Now you can start reading temperatures. In 1-shot mode, you tell the chip to start converting. You cannot read the temperature immediately, because the conversion takes time: about 1/10 of a second at the lowest resolution, and 3/4 of a second at the hightst, default resolution. So you now you need to wait a bit and poll the chip for its configuration. A bit in the configuration word tells you whether it has completed the conversion; you need to wait until this bit is set.
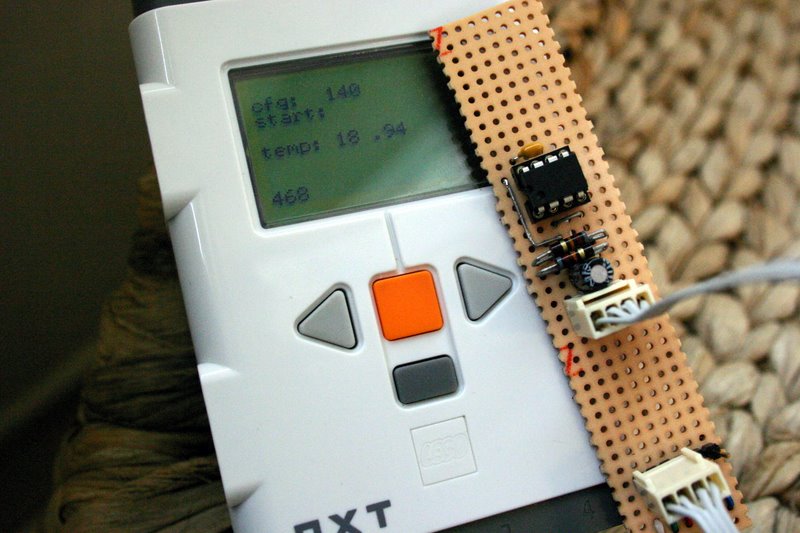
The picture on the left shows the sensor, which I constructed on a piece of prototyping board. The circuit includes only the sensor chip, the two pull-up resistors of the I2C bus, an 0.1µF bypass capacitor, and a bypass 10µF capacitor (also between the supply lines). I added the 10µF because when I first built the circuit, it didn't work well; sometimes it did, but sometimes the NXT failed to communicate with the sensor. I thought that noise on the supply lines might be the reason, so I added this capacitor.
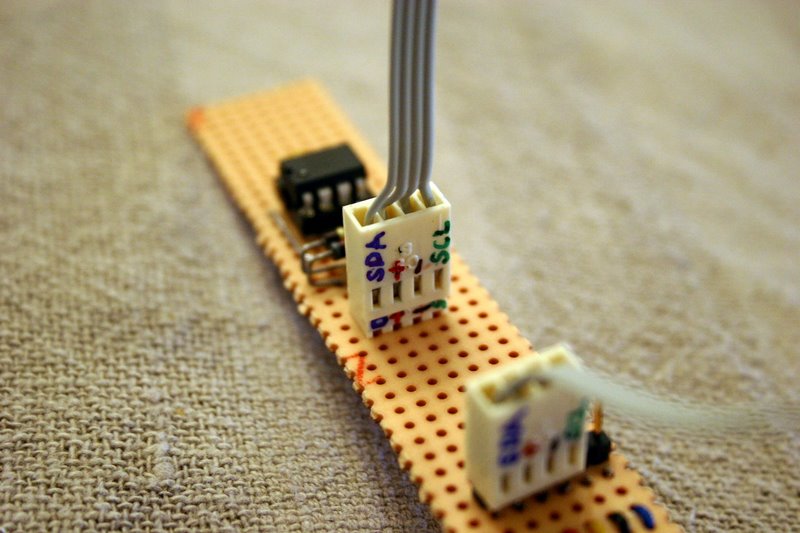
The picture on the right shows the kind of connector and flat-cable that I used. I plan to use them on I2C circuits that don't have a NXT socket or cable attached. The cables carry the two I2C lines (data, called SDA, and clock, called SCL), ground, and the positive supply line. This type of connector is called a polarized header; polarized means that you cannot plug it incorrectly. I got the idea from an I2C board by Hinnie van Sint Annaland, who used IDC connectors (a similar type, which is usually used for more wires but is easier to attach to a cable).
The ordering of the wires in the 4-wire flash cable is the one specified in the I2C specification. The specification states that for cables longer than 10cm, you must use this ordering, which separates SDA and SCL and thus minimizes cross-talk between them. Strangely, Lego used another ordering on their cables, which puts SDA and SCL next to each other. It may not matter at the slow I2C speed that the NXT uses (9600 bits/second), but I thought that it would be better to stick to the recommended ordering.
|
|
Here is the program that I used to communicate with the pressure sensor. It is basically a program to test the sensor, so it is not very elegant (and uses some NXC tricks that were necessary in the early versions of NXC but are no longer necessary).
© 2007, Sivan Toledo